What Moonstone site would be complete without a walkthrough? Cheers to Lord Peter (with a little help from yours truly) for this sterling effort.
This superb solution is the work of Lord Peter. He played the Amiga version of Moonstone, but all the tips (except perhaps the Stonehenge dagger cheat) will work on PC as well.
The Tavern recommends using this guide alongside Matt Taylor’s amazing battle tactics. Lots of the stuff touched upon in this walkthrough is also available in a more detailed form in other sections of the site.
Anyway, that’s enough from me and it’s over to Peter. Btw, thanks to YouTube you can also watch Tavern pal Ironclaw’s 1 hour-plus walkthrough of the game below.
Who to choose – what a Knight-mare
All knights are identical in terms of stats to begin with, but everyone has their own personal fave. Sir Jeffrey (the guy in the green garb) who hails from the Great Forest is my knight of choice, but that region has the easiest enemies on the entire Moonstone map (Ratmen=wusses!). I’d recommend beginners concentrate their efforts on eliminating the hardest foes first, so go blue (Sir Godber to take out the spear-wielding Troggs) or red (Sir Edward to nail the Trolls) – or risk of having your arse kicked later in the game!

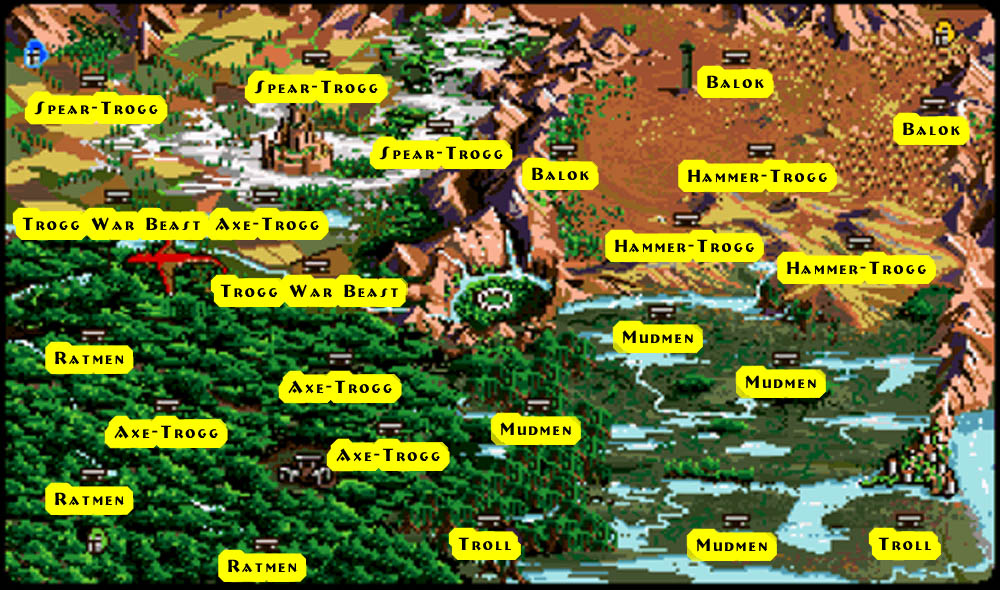
Ulf Stahl from Sweden had the brilliant idea of annotating the map so players know what monsters dwell where…
I Love to go a Wandering…
This is game map, with knights represented by cute little icons. Simply waggle your joystick to move around. Pressing Space goes to inventory, “E” ends your turn early.
Maps choices include:
- Entering a monster’s lair
- Fighting another human player or AI Black Knight
- Attacking or being attacked by the dragon.
- Visiting Math, Stonehenge, the Valley, your home village or the towns of Highwood/Waterdeep
- Simply moving too far without doing anything and wearing down your endurance
Bearing this in mind, try to maximize your range of movement every day and once you’ve decided where you’re going stick to the route. Always try to accomplish *something* each turn, especially if you’re competing against another human player.
Home is Where the Heart is
A knight can visit his own (and *only* his own) village to restore lost lives, although it’s easier to simply pop to Stonehenge for some relief instead.
Mysterious Cities of Gold
I recommend only going to either Waterdeep or Highwood when you’ve got oodles of gold flowing out of your knightly robes. (or if you are in desperate need of healing). Bear in mind that 150 pieces is the maximum your knight can carry. You cannot take the gold from conquered lairs if you are encumbered in this way, and lairs will disappear only when all items/gold are raided from them!
Sunny days, Black Knights
Don’t bother taking any notice of the computer controlled black knights. They are relatively weak and rarely carry valuable items, although they often attack – especially when you have one of the four keys. So when there is no other choice – smash them, otherwise ignore. However, skilled human players are another matter entirely!
Math-matics
Math’s Tower at least once during your quest (he’ll turn you into a toad if you pester him too often!) because he’ll offer assistance to your quest, either via magic item or by increasing one of your statistics.
Stonehenge
Offer equipment, magical items or gold to Danu’s priests to gain extra lives (Tip: choose daggers because they cost hardly anything to replace.)
Experience Points
Begin converting your experience points into hard stats as soon as you have accumulated 2 (multiplayer) or 3 (single player) of them. Prioritise increasing either strength or constitution depending upon what kind of tactics you employ, but don’t worry too much about endurance (which only allows you to move further each turn).
The Dragon
You don’t have to cleanse every single lair to finish Moonstone. However, one baddie that should certainly get his deserved comeuppance is the dreaded Wyrm. When his dark shadow blights the landscape your knightly nipples will surely tremble both in fear and anticipation of some stellar loot.
If you’re properly tooled up with a decent sword, armour and a ring or protection then the big red guy is a piece of piss. Even if you’re not, simply use Terje Høiback’s dragon-slaying manoeuvre (located in the Battle Tactics section) and let rip on his scaly hide.
If you’ve put off fighting the big guy for a while, he should be laden with all kinds of goodies (often including a key!). Other stuff you might find includes the Sword of Sharpness, Rings of Protection, Gems of Seeing, scrolls and *lots* of gold. Lovely!
Fun-Key
You can’t gain access to the Valley of the Gods (located in the middle of the Moonstone map) with first obtaining all four of these keys. Each is located in a different region, so either clear out each and every monster lair or use Gems of Seeing (a press of the space bar takes you to the inventory screen) to find out their locations.
The Quest Endeth
OK – so you’re packing the Sword of Sharpness, a ring of protection (or three) and have pumped up your stats (e.g. STR: 3, CON: 5, END: 1). Now it’s time to fight the guardian!
When the bitch is dead, you’ll get a Moonstone for your troubles. Simply head down to Stonehenge and wait for the corresponding phase of the moon before finally entering and fulfilling your destiny…
